When you buy an original Windows installation disc from the market, there is no mention of USB. Because the USB method is simple and fast, everyone love to install Windows with a USB flash drive. No matter you’re installing Windows 7/8/8.1 or 10, USB method work with all versions. Even Microsoft officially provides a tool to make a bootable USB drive, especially for users who download Windows from online store.
There are many good reasons why you should always go with the USB method, such as faster installation, no worry of disc scratches, and easy to carry. If you have a genuine license key, you can perform a clean Windows installation anytime on your computer using a ISO file and USB drive.
Do not confuse with quick install, I use USB 3.0 and quick bootable commands that’s why I call this whole process ‘Quick Windows Installation’.
Some things you should prepare
- Make sure your battery is charged to 60% or above.
- Use a USB 3.0 for quick installation.
- Download your computer drivers manually from the manufacturer website.
1. Backup your data from Windows drive
Because you’re going to perform a clean installation, all data from Windows drive will be erased forever. Please backup all data from desktop, documents, pictures, videos to a different drive. If your computer didn’t have other partitions, you should go for external storage. You can also use a free cloud storage service in order to backup files online.
2. Prepare your USB to bootable
If you have a Windows ISO file, use Microsoft USB/DVD Tool in order to create a bootable USB drive.
If you have a Windows installation disc or files, convert USB to bootable with quick commands and copy installation files in the USB flash drive.
If you don’t have ISO or installation files, Download a valid ISO from Microsoft and then use USB/DVD Tool. Follow the ISO links: Windows 7, Windows 8/8.1, Windows 10.
Note: Please use a different computer if your system has so many viruses. Viruses can delete or infect files of the USB flash drive.
3. Connect USB and restart your computer
No need to plug-out USB if you are installing Windows on the same system. For different computers, simply plug-in the USB drive and restart your computer.
4. Select USB from Boot Device Menu
By default, computers are first boot with hard drive or CD/DVD Drive. In order to boot with USB, you need to change the boot order from BIOS settings or select USB Storage from the boot device menu. Keep pressing the boot menu key after you restart or switch on your computer, select your USB from the boot menu and press the ENTER button.
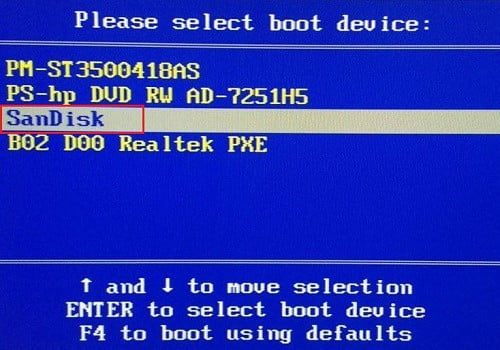
Boot device menu key of popular manufacturers:
Acer: F12, or Esc or F9.
Asus: Esc or F8.
Dell: F12.
HP: F9 or Esc.
Lenovo: F12, or F10 or F8
Samsung: Esc or F12, or F2.
Sony: Assist button or F11 or Esc or F10.
Toshiba: F12.
5. Select an installation type
Because I recommend clean installation, you should go with Custom (advanced) when it says which type of installation do you want. Custom installation deletes all files, settings and programs from the Windows drive and install a new copy of Windows. Custom installation is good for speed and performance.

6. Select a drive to install
Select a ‘System’ drive partition when it says where do you want to install Windows, click ‘Drive options (advanced)’ link from below and format the drive. Click the Next button and wait while Windows is installed. Your computer will restart several times during the installation.

Attention here, please select partition that previously used for Windows, do not select a different drive.
7. Follow on-screen instructions
When it’s done, simply follow instructions shown on your screen such as time/date, username/password, product key and more. Finally, when you arrive at the desktop screen, first please activate your Windows. Go to Control panel > System and Security > System > Activate Windows.
8. Install and Update hardware drivers
Because I go with a clean installation, hardware drivers will also be clear. Although Windows 8.1/10 automatically detect and install drivers, but you should check for driver updates using a Driver updater software. If you have a driver installation disc, please insert in your CD/DVD Drive.
You can also download the latest driver directly from your manufacturer website. Follow your manufacturer’s name and link below:
Acer: https://www.acer.com/ac/en/US/content/drivers.
Asus: https://www.asus.com/support/.
Dell: //www.dell.com/.
HP: //support.hp.com/us-en/drivers.
Lenovo: //support.lenovo.com/uu/en/GlobalProductSelector?C=1&TabName&linkTrack.
Samsung: //www.samsung.com/us/support/downloads.
Sony: https://esupport.sony.com/DRIVERS/.
Toshiba: //support.toshiba.com/drivers.
9. Find an Antivirus program
Antivirus software is highly required in Windows, and you should install it first before other programs. If you already have a genuine Antivirus, please install it now. Otherwise, buy a good Antivirus software from the market or online. If you’re searching for a free protection software, check out our list of Free Antivirus software.
[custom-twitter-feeds feed=2]

