Odin is a firmware flashing software used to flash stock firmware (or custom firmware) on Samsung Android devices. The software was officially developed by Samsung and it is only available for Windows computer. If you don’t know how to use Odin, this is the complete guide to flashing a firmware image with Odin.
Whether you want to install a custom recovery, stock ROM, or Kernels on your Samsung Android device, Odin is absolutely the easiest way to do all this stuff without using the ADB fastboot method. Samsung Odin didn’t require any registration or login, it works similar like other flashing tools.
Step 1, Download and install a few things
- Download Odin latest version on your PC.
- Download and install Samsung USB drivers.
- Download a Firmware for your device (e.g., Samsung Stock Firmware).
Step 2, Enter download mode on your device
In order to flash any firmware on your Samsung Android device, you need to enter the download mode on your device. It’s very simple, power off your device > press and hold power button + home button + volume down key simultaneously for a few seconds. When it shows a Warning message, simply press volume up key to enter download mode.

Step 3, Flash a firmware using Odin
For this tutorial, I’m going to flash a stock firmware on a Samsung device using Odin 3.12.3.
- Extract or Unzip the Firmware file (MD5 file) out of the archive.

- Launch Odin Application.

- Go to settings, enable Developer options, and then check USB debugging in your device.
- Connect your device with your PC using data cable (make sure device in Download mode).
- Look at the ID:COM section on Odin and make sure your device is detected at a COM port.
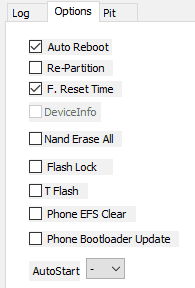
- Go to the Options tab and make sure only ‘Auto Reboot’ and ‘F. Reset Time’ is checked, nothing else.
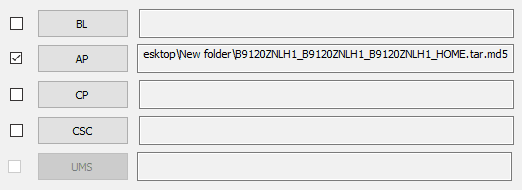
- Click on the AP button and select the Firmware file (MD5 file) you have extracted on step 1.
- Click the Start button and wait for a few minutes.
- You will see a green ‘PASS’ message to Odin when the flashing completes.
Attention: Do not disconnect the data cable while the processing is not completed. Never select a wrong firmware for your device. Use Odin carefully every time because it can brick your device.
Odin Features Explained
A simple explanation of Odin 3.12.3.
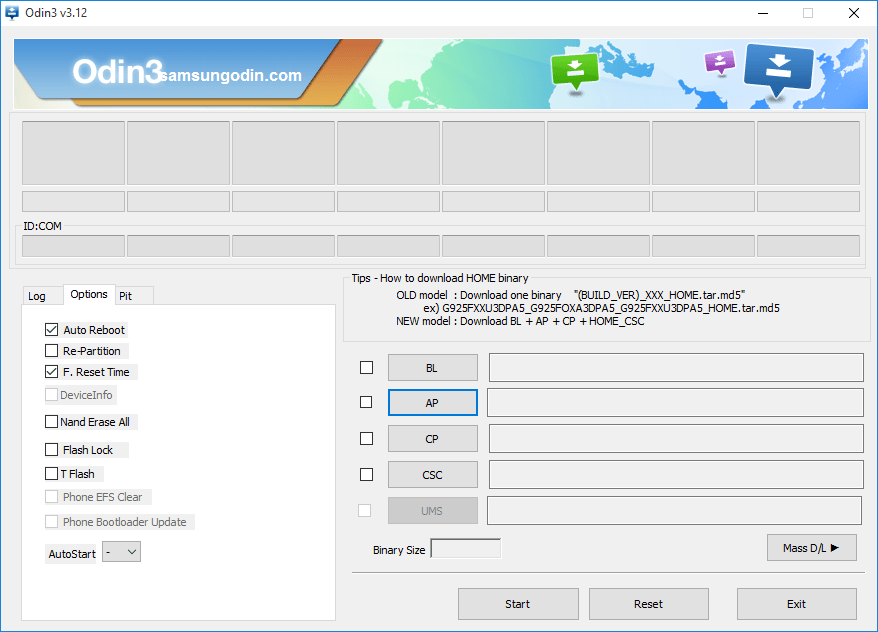
BL: BL stands for ‘Bootloader’, and it is used to flash bootloader of the connected device.
AP: It is used to flash firmware on the connected device.
CP: It is used to flash modem part of the firmware on the connected device.
CSC: CSC stands for ‘Consumer Software Customization’.
Log
The Log window display messages about all successful and failed operations performed by Odin.
Options
Auto Reboot: Your phone will reboot automatically after the flashing completes.
Re-Partition: Re-Partition the Samsung EMMC (embedded Multi Media Card) storage by using a Partition Information Table (.pit) file.
F. Reset Time: Reset the flashing counter (number of times the device has been flashed).
Nand Erase All: This will format the entire EMMC (embedded Multi Media Card) storage of the Samsung device.
Phone EFS Clear: This will clear and rebuild the EFS settings in order to repair Modem or other Radio(s) problems in the device.
Phone Bootloader Update: This option is used to update the boot software of the device.
[custom-twitter-feeds feed=2]


