You do not need a Windows installation disc to manage your computer’s hard disk partition. Using the built-in disk management tool or any third-party partition management software, you can easily shrink, resize, extend, merge, create and format disk drives on your Windows computer. The data contained in drives might not be lost or formatted while the partitions manage, but it is not guaranteed. Backup your computer or any other important data to external storage or free cloud storage.
If you have just bought a new desktop or laptop computer, then you might find that there is more than enough space in the Windows Drive partition. You can shrink space from the Windows drive and create a new volume without formatting the Windows drive.
Best Partition Management Tools for Windows (7, 8 or 10)
1. Windows Disk Management
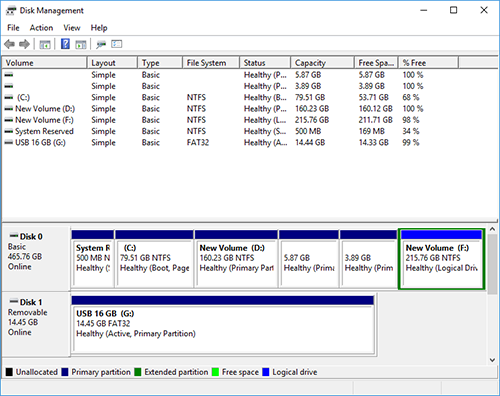
The Windows built-in disk management feature helps to manage your PC’s hard disk without requiring installation discs or computer restart. You can easily shrink, create, and extend partitions using the utility. To launch Disk Management, open Run (Windows key + R), type ‘diskmgmt.msc ‘ and press enter.

2. MiniTool Partition Wizard
The MiniTool Partition Wizard is a freeware and full featured partition manager for Microsoft Windows. It helps in formatting, deleting, shrink / splitting, expanding, resizing, merging your PC’s partitions. This tool can also change the partition table, and the drive between primary and logical.

3. EASEUS Partition Master Free
Another free and all-in-one partitioning software that helps you with a lot of hard disk management tasks which Windows built-in Disk Management tool can’t do.

Let’s start managing the partition. Please! Do not touch Windows Drive and system reserved partitions for any purpose.
Shrink
Shrink space with existing partitions, and Create a new volume. Follow the steps given below:
- Launch Disk Management Utility: Open Run (Windows key + R), type ‘diskmgmt.msc’ and press enter.
- Right-click on the volume and select ‘Shrink Volume’.

- Enter how many MBs you want to get away from the volume.

- Click the ‘Shrink’ button.
The new partition will appear as an free or unallocated space.
Create
Create a new volume using the free or unallocated space available on your PC. If you do not have a free space, then first shrink space from any volume.
- Launch Disk Management Utility on Windows.
- Right-click on Free Space / Unallocated space and select ‘New Simple Volume’.

- Press the Next button, follow the wizard.
- Finish the wizard and a new volume will now appear in Windows Explorer with other drives.
Extend
Increase the primary and logical drive space using free or unallocated space available on your PC. I am going to use the MiniTool Partition Wizard tool for this task. Follow the steps given below:
- Install and launch the MiniTool Partition Wizard on your PC.
- Right-click the partition that you want to extend and select ‘Extend’.

- Select free or Unallocated space, and press OK.

- Press the Apply icon / button.
Merge
Mix two adjacent volumes, their space and all the contents. Use the MiniTool Partition Wizard tool for this task. Follow the steps given below:
- Launch the MiniTool Partition Wizard tool on your PC.
- Click on the ‘Merge Partition’ option from the left-hand menu.

- Select a partition that you want to merge with another.

- Now select, which partition you want to merge with, and press the ‘Finish’ button.

- Press the Apply icon / button.


